A hands-on adjustment workshop with David Keil at Stillpoint Yoga London
 Last Saturday I was up in London doing a workshop with none other than Mr Yoganatomy.com himself: David Keil or as we call him in this house: DK.
Stillpoint Yoga London is nestled in the shade of London’s greatest modern landmark: the jaw droppingly impressive, Shard. The weather was lovely as I departed Brighton station and only improved by the time we arrived at London Bridge.
I bumped into DK at an evil coffee shop who’s name I won’t mention here for Search Engine Optimisation reasons where we collected caffeinated fuel for the day ahead. He’d just completed teaching 5 days of early morning Mysore practice at Stillpoint.
He structures his Mysore classes into 3 morning sessions with a group of 12 students in each session. This seems like a great way to teach for both practitioner and teacher alike. As practitioner you get loads of attention and as a teacher you get to preserve your energy and don’t miss out on what you have to give students. I’m sorry I wasn’t able to make it.
 Over the years I’ve been lucky enough to do a week-long intensive with David and attend several of his workshops on anatomy and hands on adjustments. He’s a brilliant teacher and lovely guy too. DK is not a man who does things by half measures, he’s released a double DVD set titled Yoganatomy Volumes 1 & 2 and more recently a double DVD set called Hands-On Adjustments. The quality, depth and knowledge of both DVD sets is truly impressive and they’re considered authoritative on the subject. Don’t just take my word for it though: Read some of the customer reviews on Amazon!
He’s also been running Yoganatomy.com for about 10 years – it’s the go-to place for anatomy relating to yoga. His website articles are great and thought provoking reads on the topic too.
Unsurprisingly DK has also written a book on the subject, called: Functional Anatomy of Yoga. The book is due to be available at the end of August 2014. In the meantime you can sign up to find out more about the book on his website: yoganatomy.com – just fill out the sign-up form on the right and tick the box next to Anatomy Book.
The hands-on adjustments workshop
The workshop had a really simple format and DK had only a whiteboard as presentation aide and he kicked off by asking the group two questions: What does a good adjustment feel like or achieve and how does a bad adjustment feel? He captured the words up on the whiteboard. He went on to introduce the concepts of assisted and unassisted Range of Movement (ROM).
 Then it was time for us to team up and start using our hands (and legs!). As an icebreaker we started off with a great ROM exercise – in this exercise we physically explored the concepts of unassisted ROM (using just your own muscles to move) and assisted ROM (where someone assists your range of movement). You could physically feel the end of unassisted ROM in the hamstring as you move past it towards the edge of the range of movement. At the edge of assisted ROM is an area that David describes as the therapeutic edge. Pushing beyond the therapeutic edge results in injury. over time and with skillful adjustments the therapeutic edge and the end of assisted ROM can both be increased.
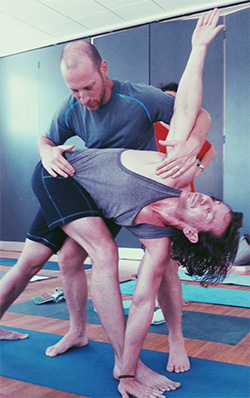
After this hands-on icebreaker we worked our way through the standing sequence of the Ashtanga practice. There were a few non-ashtangis amongst the attendees so we got to adjust Natarajasana or dancer which is not a posture I’ve even attempted before, never mind adjusted (it comes at the end of Advanced A). David would first introduce a posture and then demo. The picture above shows David Keens receiving receiving an adjustment in parivrtta trikonasana.
Instead of giving a blow by blow account of each pose I thought I’d share some of my own thoughts and insights on hands-on adjustments that came up for me during the workshop.
Receiving hands-on adjustments
As a practitioner I’ve mostly enjoyed being adjusted. It’s helped me break patterns of movement and considerably increased my ROM. It’s also an important way to build trust between teacher and student, early on. This is much needed as one goes deeper into the practice.
I’ve also been injured by teachers adjusting me. In fact it’s taken me years to recover from the injuries. Yet, I still allowed teachers who had injured me to adjust me. Why? Well our relationship was based on trust and surrender. I trust them and I surrender to the adjustments – which were mostly beneficial. I take some responsibility for my injuries and I also see them as part of a healing process that needed to occur in my spine.
3 years later my back is stronger than it’s ever been and I have much less pain than I’ve ever had. When I’m practicing strongly and don’t get enough rest then I do get back ache, but in my book that’s perfectly normal – considering the intenstity of the Ashtanga practice. You might ask why I do a practice that is so intense, but that’s a topic for another day. The short answer is: I need it.
When I was in Mysore last year two of my friends were injured by forceful adjustments. Neither of them seemed to blame the teacher or the assistant. I feel ambivalent about this. On one hand I feel it’s a teacher’s job to help the practitioner bring about deep physical or even psychic change, and this includes challenging a students beliefs about their own limits, but I draw the line at injury.
On the other hand, practitioners are responsible for allowing themselves to be adjusted and for not confronting teachers in the event of an injury. I myself also never confronted the teachers concerned. This culture of silent submission worries me and I don’t think it helps teachers or practitioners. My experience has led me to the following resolve: As a practitioner, I will always surrender to whoever is teaching, until the point where I no longer feel safe. If I’m injured in future by a teacher I’ll let them know and give them feedback.
Giving hands-on adjustments
As a teacher, I enjoy adjusting students and having a clear intention is fundamental to giving great adjustments. If you’re not clear on what you’re trying to achieve by adjusting a student then how will you be able to communicate this to them? David places a strong emphasis on a clear intention or a purpose to any given adjustment.
In order to make a good decision about what the student needs you first need to spend some time observing them. This is the first thing I was taught when first learning to adjust.
Here are the some great tips from the inside sleeve of David Keil’s Hands-On Adjustments DVD:
- Observe the student
- Be aware of your own bias
- Create a clear intention
- Ground the student
- Feel and sense
- Adapt to the student
- Move into adjustments slowly
- Create space and length
- Use good body mechanics
- Don’t over adjust or adjust poses you don’t do.
When I adjust students I’m looking for signs during an adjustment that give me cues as to how it’s going. I’m particularly feeling for increasing tension or release in the body and changes in breathing. David describes this as a two way conversation between the student and teacher.
I also like to think of an adjustment as a journey with 3 parts (with a space theme of course):
1. Lift off
 Once a clear intention is set, getting into position efficiently and quickly (without rushing) is important to build confidence in the student and also clearly communicate the intention of the adjustment. It’s best to not to reposition yourself too many times. David allows ‘one chance’ when repositioning.
2. Orbit
 On a good day this is where the magic happens and there’s a lot that can be going on as you and the student journey towards the therapeutic edge. It normally takes a couple of breaths for the student to settle and relax before going deeper. This is very much a two-way conversation: listening, feeling and responding to what’s going on with the student in the adjustment.
3. Touch down
 It’s important not to linger. Be decisive and leave the adjustment cleanly. Efficiency is key and it’s important not to interrupt the benefits of the adjustment. I find it can also be nice to offer a word of encouragement like: ‘Well done’ or if I’m feeling cheeky ‘better luck next time’.
Thoughts on adjusting for new teachers:
It’s easy to overlook the benefits of using verbal cues when adjusting. Something simple like ‘drop your shoulders’, ‘navel in’ or ‘relax your mouth’ can also act as a useful reminder to other students in the room.
It’s common when first learning to adjust, to over adjust or under adjust. It can be tricky to get the balance right. The more you adjust the better you’ll get at it. I still find it useful to ask students how the adjustment felt if I’m not sure.
Finally
If you’ve been adjusted poorly I highly recommend having a word with your teacher, you’ll be doing them a service by giving them constructive feedback. I plan on doing this in future myself. Choosing the right moment to do this is also important, and in class, or by text might not be it. Think about an appropriate way to communicate with your teacher.
If you’re learning to adjust and are finding it challenging as many do, try not be too concerned about not getting it right. Always take the time to reflect on feedback you’re given and allow yourself to keep making mistakes. It gets easier as you practice the same adjustment over and over again on different body types and students of different ability and temperament – Just keep listening and try to relax.
I enjoy receiving and giving adjustments and in our modern world I feel that therapeutic touch can be a great tool for building trust between the same and opposite sexes, teachers and students. It reminds us all that we’re on the healing journey of yoga together.
No comments yet.